Monday, May 30, 2011

Turtle Swirl Cheesekake of Heaven

Chocolate Teddy Graham with caramel hair
Silly Steph and being with her family and boyfriend. While she was making those delicious looking cinnamon and butterscotch cupcakes, Kate and I had a weekend of turtle cheesecake, chicken 'n peas on rice, and blueberry pancakes. The turtle cheesecake was definitely the highlight.

We knew we wanted to cook over the weekend, and Kate said she had a jar of caramel that needed to be used so we decided a caramel cheesecake would be wonderful, and maybe some chocolate to turn it into a turtle cheesecake would work? Yes. Yes it would.

Turtle Swirl Cheesecake
Crust
9 oz Chocolate Teddy Grahams
6 Tbs butter, melted
Cheesecake
4 8-oz packages of cream cheese, room temp
1 1/4 cup sugar
5 large eggs
1 1/2 tsp vanilla extract
Chocolate
Food processor killing teddy grahams
3 Tbs whipping cream
4 oz semisweet chocolate, either chips or chopped
Caramel (our's was Fresh Market creamy caramel from a jar)
Chopped pecans

Preheat oven to 350.
Kill the teddy grahams. No really. Chop them finely, such as with a food processor, then mix with the butter. Line a springform pan with the crumbs, about an inch up the sides.

Stephen ladle's cheesecake into the pan
Beat the cream cheese until fluffy. Add in the sugar gradually, beating between each addition. Add each egg separately, beating between each egg. Finally add the vanilla extract. Leave this be while you get the chocolate ready.

You could use the regular double boiler method used for ganache, or if you don't have one: bring whipping cream to simmer, then add in chocolate. Melt.

We had Kate's jar of caramel, so we spooned out some of it then brought it to nice liquid consistency in the microwave.
Before being swirled in
Put about half of the cheesecake into the pan, then put on about half of the chocolate and however much caramel you feel is needed. Use a fork to swirl it through the cheesecake, but don't overdo it or you lose the effect. Then spoon the rest of the cheesecake on top of this layer and repeat with the rest of the chocolate and caramel.

Cheesecake in the oven
Put into the oven and bake for around an hour. I put a cake pan full of water below the cheesecake in the oven to help keep it from splitting. When it's done it should be a little wiggly in the middle.
Place onto a rack to cool, the put it into the fridge. When ready, run a knife around the outer edge of the pan then release the spring.

We only let it cool around 3 hours before eating, and it was delicious, but some more was tried today. Letting it cool for around a day makes it very delicious, letting the caramel and chocolate flavor spread through the cheesecake and the cheesecake become an even better consistency.
The beautiful finished product
Once out an ready to be served, melt some more caramel down and drizzle over the top of the cake. Bring to the table for more drizzle on each slice. Place pecans over cake before cutting.

We had some chicken with Mrs. Dash Onion & Garlic, paprika, and onion flakes for seasoning for dinner along with peas and rice. It was good. Don't be afraid to randomly mix spices together, but do be afraid when Kate has raw chicken and a knife. She's such a zombie.

Kate flips some pancakes!
Monday morning we made blueberry pancakes. Smitten Kitchen's pancake recipe was used for the pancakes and they were very delicious. Blueberries are so good...

Yay baking! Go food! Happy Memorial Day!

Stephen

Sunday, May 29, 2011

Memorable Cupcakes

With Memorial Day weekend in full swing I figured the cookout my family and I were going to would be the perfect excuse to make the cupcakes I had been wanting for so long.


Honestly, any time is the perfect time to make cupcakes, especially cinnamon
cupcakes with butterscotch icing.  The first order of business was to dump half a bag of confectioner's sugar everywhere (you can skip this step if you are less clumsy than me).


 Cinnamon cupcakes = snickerdoodle cupcakes and they are one of my new favourite things.  And I know, you're thinking that butterscotch icing so does not go with cinnamon, but just trust me and your taste buds will thank me.  Mine also have a special surprise inside that I'll show you a bit later on.


Cinnamon Cupcakes
1 cup all-purpose flour
3/4 tsp baking powder
1 tsp ground cinnamon
1/8 tsp salt
1/2 cup milk
4 tbsp room temp unsalted butter
2 large eggs
3/4 cup + 2 tbsp sugar
1/2 tsp vanilla extract

Preheat oven to 350 degrees F. Combine the baking powder, cinnamon, salt, and flour. In a separate bowl combine butter and sugar in mixing bowl. Add in eggs and vanilla and stir until thoroughly combined. Alternate between the flour mixture and milk and mix until combined.  Fill cupcake pan with liners and add batter to liners until they are 2/3 full.  Bake 16-18 min.  Allow to cool 5-10 min and then remove from pan to cooling rack.  Ice when completely cool.

  Butterscotch Buttercream Icing
 11oz butterscotch chips *
1 cup heavy cream *

1 stick unsalted butter
1/3 cup butterscotch ganache *
1 tsp vanilla
1/8 tsp salt
16 oz powdered sugar
splash of milk or cream as needed

*In a double boiler (or a microwave-safe bowl) melt the butterscotch chips with the heavy cream and combine until smooth. 


Separate 1/3 cup from this and allow to cool (should take about as long as the cupcakes themselves.) Then cream the butter and gradually mix in the powdered sugar. As the mixture gets too thick to mix add the ganache, vanilla, and salt. 

 Now, here's my favourite bit. I took an orange juicer (one of the ones you stab in and suck the juice out with) and cut out the middle of the cupcakes so I could fill them.


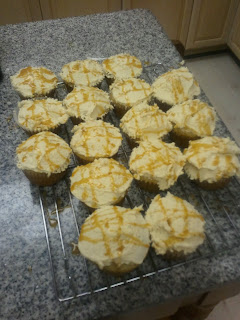
You can either fill them with the extra ganache or just fill them with icing. Either way, fill up a Ziploc bag with your choice and squirt it in there and then ice the tops of the cupcakes with your buttercream.  Then drizzle with the ganache and you're done!


Sorry for the blurry pic, dogs were attacking my toes...

All packed up and ready to go!
 I'm so happy I finally got to make these. I laugh every time I reach the middle of the cupcake just because the icing comes gooshing out! It makes meh happeh!

Until next time,
Steph

Sunday, May 15, 2011

Even Better Peanut Butter Brownies

Batter in the pan before going into the oven
That was a very good weekend. Nail polish, eating, goofing around, baking, swimming, s'mores, Doctor Who series 6, Doctor Who series 1, Eurovision, and some more Doctor Who series 1. All with some really great people. Saturday, the main event day, started with some delicious french toast casserole (I think it was a soufflé actually) provided by Stephen and his mother. As we didn't make it, I don't know the recipe, but it was lots of bread, egg, and maple syrup. We covered it in blackberry syrup and it became the perfect breakfast.

Stephen adds the ganache
Hot dogs were planned for dinner, so we thought we'd provide dessert. Various choices were discussed, and it was finally chosen to make peanut butter brownies. The recipe was found on smitten kitchen.

These peanut butter brownies consist of a batter of peanut butter (a full cup!) with all the other stuff you normally use to make a baked good of this type, with some chocolate chips put in as well. We got to adventure out to Publix to pick up more chocolate chips, since it took 1 1/2 cups in the batter and 1 1/2 cups in the ganache. The ganache was made the same way our butterscotch one was - lots of chocolate chips with heavy cream in a double boiler. After the brownies came out, they cooled for an hour, during which we ran to Publix and made the ganache. It was covered in the delicious chocolate, and then we headed over to a friend's for the pool and fun.
ooooooooo.

When these babies were served, the ganache had only had an hour to cool and settle, so was still very liquidy. It dripped all over our hands, but it was amazingly tasty so who cared. I tried another tonight after it had much longer to settle, and it was the perfect consistency of creamy but solid enough to not drip all over the place. Definitely a dessert to try if you're in the mood for peanut butter and chocolate.

-Kate

Thursday, May 12, 2011

Hawt Pockets

Hawt Pocket goodness!!
We've only been out of school a few days, but being away from the apartment and my friends is really hitting me pretty hard. I mean, sure, I have loads of time to think up new ideas for cooking now that I'm not battling the homework monster, but when you're best friends are this cool you want to cook with them all the time.

Fortunate for me, we had to have an Humans vs Zombies admin meeting this past Monday, meaning we're together again in the kitchen! So a quick run to Publix and the tasty creations that had been in my head were ready to get in mah belly!

Now, in my head these were a great idea, but in action they are better than I ever could have conceived. Where Hot Pockets are greasy and weighty, these are light, fluffy and perfectly filling (at least for me), and you can add what ever you like as a filling!

Alright, to the important things: the recipes!

Yields 12 Pizza Hawt Pockets
3 refrigerated crescent roll tubes (We used Publix brand, but you can use Pillsbury, you'll want the 8 count)
*1 recipe pizza sauce (or you can use the pre-made sort)
mozzarella cheese (however much you want/can fit)
pepperoni (optional, you can add what ever you fancy)

Mater sauce. Also good with cheese sticks.
Make sauce.
*Sauce recipe:
1 small can tomato sauce
1 small can tomato paste
Basil, cumin, oregano, rosemary, thyme, garlic powder, onion powder, salt and pepper (all to taste, but start with a pinch of each)
2 tbsp sugar
2 tbsp grated parmesan cheese

Combine all in a small pot and simmer until heated through. For best results you'll want to let it simmer a while, but it's fine with out that.

Preheat oven according to the Crescent roll packaging. Begin by laying out the rolls as rectangles on a pizza stone (or a cookie sheet if you don't have one). Now, spoon on some sauce on to one half of each of the dough bits (making sure to leave room around the edges to pinch the pocket closed). Next is cheese and toppings.  Don't go too crazy or they won't close properly.

Stephen checking on the pretties
Fold the pocket closed and seal the edges by pressing them with a fork. Score the tops with a knife and then pop them in the oven.  Begin with the recommended time for the rolls. After that check on them often, and remove them as they become golden brown.


If you have a little sauce left over, you should definitely dip them in it. Your face will look like this ^_^
That was our last culinary adventure before we parted ways again. But I'll see them all again on Saturday and it's looking as though we have plans to make s'mores brownies! Yum!

For now goodbye and happy nomming,
Steph

Monday, May 9, 2011

Wedding Cupkakes

So you saw the wedding invitation posted earlier by Kate. The wedding was yesterday, ordained by me, over Skype with Steph and Kate in the room and Emily at her house. It was beautiful, and the three are happily married now. What lovely wives.

But Kate got to my house early in the day. Steph always hands me food when I show up, so it was time to return the "favor". Kate and I baked butterbeer cupcakes before Steph got here, and they were deliciousness. q!

Have you ever had butterbeer? Butterbeer cupcakes? You should. We got the recipe from here, and I highly advise you do the same.

It consists of a butterscotch ganache injected into the cupcakes along with mixed into the icing along with drizzled over the cupcakes. This is really my favorite part of this recipe, as I talk about this part all the time. You could melt down chocolate or white chocolate instead of butterscotch chips, and then you'd have a delicious white chocolate ganache... Mmmm... White chocolate ganache would be really delicious right now.

Also discovered that apples dipped in this is delicious (which makes Steph sad cause she can't eat apples) and it can be mixed into frappuccino nicely (which Steph loved lots).

These were used as the wedding cupcakes, but we never really had a moment of cutting the cake or anything. Everyone enjoyed it nonetheless, and we advise you try this recipe as well.

Happy nomming,

Stephen

Saturday, May 7, 2011

Tuesday, May 3, 2011

Stir Fry Shenanigans

Today we were denied of sweet desserts and instead came actual food! We met up with the girls that will likely be our roommates for next year, and because we spent all that time in the living room nothing got cooked, until Kyle started whining for dinner. We didn't have anything good in the apartment, and we were in the mood for Chinese, so we piled into Steph's car and headed to Publix. We wandered the aisles and decided on lo mien, so we bought some noodles and an onion, and some hummus for Kyle, then headed back to the apartment.
Me cooking the stir fry - the camera makes the oven turn purple

It was raining like crazy, but Stephen was very nice and let me wear his raincoat. Everyone else ran from the car into the apartment, but I got to go through the downpour mostly dry.

We got back to the apartment and made some delicious lo mien.

Short version of the recipe:

  • Noodles, boiled and put under the sauce
  • Stir fry meat (about 1 lb)
  • Garlic cloves crushed by me (I love doing the garlic press)
  • Onion, chopped
  • Frozen vegetables (carrots, peas, and corn)
  • Spices: curry, ginger, cayenne pepper, chili powder, salt, pepper, garlic powder, onion powder, all to taste
  • Soy sauce, teriyaki sauce, and some stir fry sauce. All to taste of course.
I'm not really sure how Steph knows how much to put in, but it's always the right amount. Water was put on to boil and it simmered until after the vegetables. Onions and garlic was sauteed, then the meat with spices was added. These were stirred until the meat was browned, then the frozen vegetables were added. The noodles started in the pot then, and when it was all done was served noodles with stir fry on top.
Finished product!
While I was doing the stir fry, I got to beat up meat! Yaaaay! And Stephen and Kyle had a towel fight - apparently Kyle is very good with a towel as a whip, but he is weak against wooden spoons with stir fry sauce on them!


So we ate the delicious stir fry lo mien and sat around the living room just joking around. I choked on tea at one point, and we made lots of awkward jokes and messed with our friend Emily's head through multiple logins by the three of us.

Another night down in the delicious kitchen of CSA 106.
-Kate

Impatient Cinnamon Rolls

Properly excited about the deliciousness
While I know this is supposed to be written from Stephen's perspective, I couldn't give up writing about one of my favourite things I've made.  Cinnamon Roll Muffins have to be the best thing ever for breakfast. Ever. Two batches didn't even last a week.  I can't really explain how excited I was about these things so I'll give you a picture of it instead.


Happy oven!

We were supposed to make real cinnamon rolls that night but I was impatient and wanted them right then. So I proposed making them into muffins and Google knew how!  It sent me to this site: http://www.joythebaker.com/blog/2008/09/easy-cinnamon-roll-muffins/ which is now one of my all time favourite sites for baking.

There have been very few times that I just wanted to stick my head in the oven and eat all the muffins before they come out, but this was one of those times. The apartment smelled AMAZING!!

 
Mmm! Cinnamon Roll Muffins :)
Even the 20 minutes they take to bake was too much for me. As soon as they came out of the oven I was eating the bits of carmelised brown sugar and cinnamon off the pan while they cooled. Soooo tasty!!!!


If they last long enough to be iced, be patient enough to wait for the icing to harden. It's so good as a final product, but eating as you go they are still good.

Next time I make them I'm going to put some apples in and see how yummy they come out.  Luckily I have Socialist Kake to keep my sugar craving under control.


Hasta pronto Interwebs!
Steph

Socialist Kake

Kate and Steph!
Hi! This is Steph & Steph Jr!

And this is their story. q! They cook a lot and live in an awesome apartment. Well, Steph does, but Kate spends more waking time in here than anywhere else.


Socialist cake


Today's adventure was Socialist Kake! It's delicious. Tasty cake. q! We made a boring yellow cake with red food coloring to turn it into an exciting pink-red cake! Yellow fondant (not the crap kind, homemade fondant) was made to go onto the exciting red cakes!

Story behind the cake was Steph's professor Vince said she couldn't make something too sugary - "I accept this challenge!" (must be said in French accent).  So with a meeting with him tomorrow the sugary disaster had to be made in the kitchen.

Steph's booby ball

With the leftovers, Steph made cake paste and then used the extra fondant to make a booby ball (or what ever it was... It was weird and pure sugar).

There were also some fondant-cake paste babies, but they weren't all that cute. q! They all got eaten by me.

So you want the recipe? Yes? Yes.

Basic yellow cake
Prep time: 15 minutes (I don't believe this)
Cook time: 25 minutes (I do believe this)
Total time: 40 minutes (More if you have to leave to Target halfway through to go get powdered sugar)
Yield: 2 9-inch cake rounds

  • 2 cups cake flour
  • 2 teaspoons baking powder
  • 1/2 teaspoon salt
  • 1/2 cup butter, softened
  • 1 cup sugar
  • 3 large eggs
  • 2 teaspoons vanilla (but really, nobody's counting)
  • 3/4 cup milk (or maybe 3/4 cup heavy cream)
Preheat oven to 350F. Grease and flour 2 9-inch cake pans.
Combine flour, baking powder, and salt.
Cream butter and sugar till light and fluffy! We used a nice mixer that goes in circles. Beat eggs and vanilla together, and mix with butter-sugar mix gradually. Alternately add flour mix and milk to mixer. Then you attack it with food coloring, one of Kate's favorite things in the world. We used a lot of red to get it a nice pink color. Divide between the two pans.
Bake for 20 to 25 minutes. Cool in pan, and if you haven't attacked it thoroughly with Pam you should probably take it out around 5 minutes after it comes out.

Buttercream icing
Buttercream Icing
  • 1 stick butter (1/2 cup)
  • 4 cups powdered sugar
  • 1/4 heavy cream
  • 2 teaspoons vanilla (but again... who's counting?)
Melt butter. You could just mix it up, but melting in the microwave is more fun. Then mix in the sugar, then once you can't mix it any more mix in the heavy cream, and finally the vanilla. Add more heavy cream as needed. Mix until smooth. Then attack it with more food coloring. I did a lot of yellow and Kate did too much red, messing it up. It came out a nice peach color.

Awesome Fondant (Not crap fondant)
  • 3 cups mini marshmallows (we used half yellow bunny and half mini-marshmallows)
  • 1/2 ounce white bakers chocolate
  • 2 teaspoons vanilla
  • 3 cups powdered sugar
  • 1 tbsp butter chopped up
  • 1 1/2 teaspoons heavy cream
Yellow food coloring to fondant
Put marshmallows, chocolate (chopped up), butter, and heavy cream into a microwave safe bowl in the microwave for around a minute, or whenever your marshmallows get fluffy. Use a big bowl or else they'll probably overflow. Take out of the microwave and add the vanilla along with two cups of powdered sugar. Then place onto your chosen location of fondant war. Kate does this part, and it's gross. Your hands will be eaten by the fondant, until you get it into a manageable ball. Once it's gotten to a point of being fairly solid, add the food coloring again - this fondant was yellow. Massage it into the fondant, and you get awesome tasting yellow fondant!

Ice the cakes with the buttercream, then use this as a glue to put the fondant onto the cakes. We made two tiered cakes, one larger than the other, then with leftover fondant made an interesting blue-green fondant. The sickle and star was cut out of this and placed on the cake. End result, awesome socialist kake!

Me and the french fries from Target
Sadly, this wonderful evening was made quiet by a noise violation. Maybe making kake during finals week wasn't the best idea, but we needed a break from the studying.

So goes today's adventure of Center St Apartment 106 Chefs.
-Stephen